The Control Panel is something that just about any Windows user will have to access at some point during their computer's life. On many Windows computers, a link to the Control Panel is included on the Start menu, but if you like, you can also add a shortcut to it on the desktop.
To create a Control Panel shortcut, right click on an empty area of your desktop and from the context menu, choose New. A submenu will appear; select Shortcut. After a moment or two, the Create Shortcut wizard will open.
The first thing to do in the wizard is to point the shortcut to the file or program you want to open. For a shortcut to the Control Panel, type "control" in the text field, and then click Next to go on to the next page.
You'll be asked to enter a name for your shortcut. The default shortcut name will be the same as the location of the file (which in this case is "control") but you can delete it and enter your own name for the shortcut (such as "Control Panel Shortcut" or anything else you want to call it). Once you've decided on a shortcut name, click Finish.
The Control Panel shortcut will appear on the desktop in the area where you originally right-clicked to open the wizard (unless you have Auto Arrange enabled), but you can move the shortcut anywhere on your desktop that you want. You can even drag it down to your Quick Launch bar, if you have that toolbar enabled, for even easier access.
By default, the Control Panel shortcut in Windows XP will use a generic icon that looks like a blank computer screen. (In Vista, it will be a more appropriate program icon.) You can customize the shortcut to use another icon by right clicking on the icon and selecting Properties, then clicking Change Icon under the Shortcut tab. A large list of standard Windows icons will be displayed, and you can choose whichever one you want to use. (On Vista computers, you'll have to browse to find the icons.) If an error message pops up stating that there are no icons, click OK and then the icon list will be displayed. If you have other icons saved on your computer, you can browse to the location where they are stored and choose one of them to use instead.
(Originally published on Helium.com, December 2011)
Showing posts with label Windows Vista. Show all posts
Showing posts with label Windows Vista. Show all posts
Sunday, May 24, 2015

Monday, December 15, 2014
How to set up a static IP address in Windows Vista
Static IP addresses are often used for computers that host specific services, or for computers on small, manually managed networks. To set up a static IPv4 address on a Windows Vista computer, first find an IP address that is not currently in use and is outside the DHCP assignable range (if applicable). Then follow either of the procedures below.
From the taskbar:
1. Right click on the network connection icon in the system notification tray.
2. Select Network and Sharing Center.
3. Under Tasks, select Manage network connections.
4. Right click on the network connection that you want to set up the IP address for (Local Area Connection, Wireless Network Connection, etc.)
5. Select Properties.
6. If the User Account Control window pops up, select Continue.
7. Click on Internet Protocol Version 4 (TCP/IPv4).
8. In the Properties window, click the circle next to Use the following IP address.
9. Enter the IP address that you want to assign to the computer.
10. Enter the subnet mask and default gateway. (For small or home networks, these will typically be 255.255.255.0 and 192.168.1.1, respectively.)
11. Enter the IP address of the DNS server next to Preferred DNS server.
12. If you have an alternate DNS server, enter that IP address as well.
13. Click OK to save the changes.
From the Start menu:
1. Click the Vista orb.
2. Right click on Network.
3. Follow the procedure above, starting with step #3.
Reserving an IP address under DHCP is different from setting up a static IP address, but if you are setting up a static IP address that is within the DHCP range you will need to reserve it too. To reserve an IP address, log into your router's configuration utility and look for a heading such as DHCP or IP Address Distribution. You will probably need either the computer's Windows name or its MAC address in order to reserve an IP address for it.
(Originally published on FixYa.com, January 2011)
From the taskbar:
1. Right click on the network connection icon in the system notification tray.
2. Select Network and Sharing Center.
3. Under Tasks, select Manage network connections.
4. Right click on the network connection that you want to set up the IP address for (Local Area Connection, Wireless Network Connection, etc.)
5. Select Properties.
6. If the User Account Control window pops up, select Continue.
7. Click on Internet Protocol Version 4 (TCP/IPv4).
8. In the Properties window, click the circle next to Use the following IP address.
9. Enter the IP address that you want to assign to the computer.
10. Enter the subnet mask and default gateway. (For small or home networks, these will typically be 255.255.255.0 and 192.168.1.1, respectively.)
11. Enter the IP address of the DNS server next to Preferred DNS server.
12. If you have an alternate DNS server, enter that IP address as well.
13. Click OK to save the changes.
From the Start menu:
1. Click the Vista orb.
2. Right click on Network.
3. Follow the procedure above, starting with step #3.
Reserving an IP address under DHCP is different from setting up a static IP address, but if you are setting up a static IP address that is within the DHCP range you will need to reserve it too. To reserve an IP address, log into your router's configuration utility and look for a heading such as DHCP or IP Address Distribution. You will probably need either the computer's Windows name or its MAC address in order to reserve an IP address for it.
(Originally published on FixYa.com, January 2011)
Saturday, December 13, 2014
How to adjust the page file size in Windows Vista
The page file (or swap file) is a portion of the hard drive that Windows reserves to use as additional memory when necessary. You can make the page file smaller or larger than its current setting, or you can disable it completely.
To change the page file size:
1. Click the Vista orb.
2. Right click on Computer.
3. Select Properties.
4. Under Tasks on the left hand side, select Advanced system settings.
5. If the User Account Control window appears, click Continue.
6. Click the Advanced tab.
7. Under Performance, click the Settings button.
8. Click the Advanced tab.
9. Under Virtual memory, click the Change button.
10. Select the hard drive that you want to adjust the page file for. (Typically this will be the C: drive.)
11. If Custom size is not already selected, click the circle next to it to select it.
12. Enter an Initial size and Maximum size for the page file in megabytes. The maximum size must be equal to or larger than the initial size, and both values should be at least one and a half times the amount of physical RAM that is installed in the computer.
13. Click the Set button.
14. Click OK to save the changes.
15. Click OK again in the Performance Options window.
16. Click OK in the System Properties window.
17. Reboot your computer for the change to take effect.
If your computer performs erratically after changing the page file size, go back into the settings and either change it back to its previous value or try a new value. Virtual memory errors are a good indicator that the page file is not large enough to handle what Windows needs it to do.
(Originally posted on FixYa.com, January 2011)
To change the page file size:
1. Click the Vista orb.
2. Right click on Computer.
3. Select Properties.
4. Under Tasks on the left hand side, select Advanced system settings.
5. If the User Account Control window appears, click Continue.
6. Click the Advanced tab.
7. Under Performance, click the Settings button.
8. Click the Advanced tab.
9. Under Virtual memory, click the Change button.
10. Select the hard drive that you want to adjust the page file for. (Typically this will be the C: drive.)
11. If Custom size is not already selected, click the circle next to it to select it.
12. Enter an Initial size and Maximum size for the page file in megabytes. The maximum size must be equal to or larger than the initial size, and both values should be at least one and a half times the amount of physical RAM that is installed in the computer.
13. Click the Set button.
14. Click OK to save the changes.
15. Click OK again in the Performance Options window.
16. Click OK in the System Properties window.
17. Reboot your computer for the change to take effect.
If your computer performs erratically after changing the page file size, go back into the settings and either change it back to its previous value or try a new value. Virtual memory errors are a good indicator that the page file is not large enough to handle what Windows needs it to do.
(Originally posted on FixYa.com, January 2011)
Friday, December 5, 2014
How to enable or disable the Sidebar in Windows Vista
The Windows Sidebar, introduced with Windows Vista, is a way to have one-click access to websites and widgets right from your desktop. Some people love the Sidebar and some people hate it. Whichever camp you happen to fall in, enabling or disabling the Sidebar is a painless process.
To disable the Sidebar:
1. Right click on the Sidebar icon in the notification area (a computer screen with different colored blocks on its right side).
2. Select Exit from the menu.
3. If a confirmation window appears, click Exit Sidebar.
To enable the Sidebar:
1. Click the Vista orb and type "sidebar" into the Search bar.
2. From the search results, select Windows Sidebar. (If Windows Sidebar is the highlighted item, you can just hit <Enter>.)
3. The Sidebar will appear, in the same place and with the same widgets as the last time you used it.
An alternate way to enable the Sidebar:
1.Click the Vista orb.
2. Select All Programs.
3. Select Accessories.
4. Select Windows Sidebar.
To configure the Sidebar to load automatically every time you start your computer:
1. If it's not already enabled, enable the Sidebar (using either of the methods described above).
2. Right click on the Sidebar icon in the notification area.
3. Select Properties.
4. Put a check mark in the box next to "Start Sidebar when Windows starts."
5. Click either OK or Apply.
If you have the Sidebar set to load automatically and then you disable it, it will still run every time you start your computer, unless you remove the check mark next to that option in the Sidebar properties.
(Originally posted on FixYa.com, January 2011)
To disable the Sidebar:
1. Right click on the Sidebar icon in the notification area (a computer screen with different colored blocks on its right side).
2. Select Exit from the menu.
3. If a confirmation window appears, click Exit Sidebar.
To enable the Sidebar:
1. Click the Vista orb and type "sidebar" into the Search bar.
2. From the search results, select Windows Sidebar. (If Windows Sidebar is the highlighted item, you can just hit <Enter>.)
3. The Sidebar will appear, in the same place and with the same widgets as the last time you used it.
An alternate way to enable the Sidebar:
1.Click the Vista orb.
2. Select All Programs.
3. Select Accessories.
4. Select Windows Sidebar.
To configure the Sidebar to load automatically every time you start your computer:
1. If it's not already enabled, enable the Sidebar (using either of the methods described above).
2. Right click on the Sidebar icon in the notification area.
3. Select Properties.
4. Put a check mark in the box next to "Start Sidebar when Windows starts."
5. Click either OK or Apply.
If you have the Sidebar set to load automatically and then you disable it, it will still run every time you start your computer, unless you remove the check mark next to that option in the Sidebar properties.
(Originally posted on FixYa.com, January 2011)
Saturday, August 30, 2014
How to view the network map in Windows Vista

Click on the Vista orb (the icon with the round Windows logo) in the lower left corner of the screen. The Start menu will appear right above where you clicked. In the Search bar on the Start menu (the text field where the cursor is that says "Start Search") type the word "network". In the results that appear at the top of the Start menu, click on Network and Sharing Center.
The Network and Sharing Center will open in a new window, and at the top of the screen will be a brief representation of your network that will probably consist of your computer, the router or gateway that your computer connects to, and a globe that is labeled "Internet." To view the full network map, click on the "View full map" link above and to the right of these icons. The network map will appear (though it may take a few seconds to load). Most, if not all, of the computers and other network devices connected to your network should be represented on this map, connected by lines or dotted lines. You may see routers, switches, printers, and other devices, depending on how large your network is. Each device will be labeled with its name or by a generic label (such as "Switch").
Some older computers and other network devices may show up at the bottom of the network map, or not at all. This is likely because those devices don't have the necessary LLTD (Link Layer Topology Discovery) protocol installed. If you can't view the network map at all, check to be sure Network Discovery is enabled on your PC.
(Originally published on Helium.com, Nov 2011)
Monday, August 25, 2014
How to update a WEP key for a Windows Vista PC
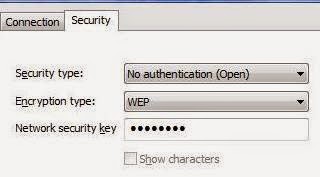
Many wireless networks, especially older ones, use WEP encryption to protect the network from intruders and strangers. Once you've set up a wireless connection in Windows Vista with a WEP key, you can automatically connect to that network without having to re-enter the key every time. But if the WEP key is ever changed (either by you or someone else) you'll need to update the WEP key on your computer so that you can reconnect to that network.
In the system tray in the lower right corner of the screen there should be an icon for your wireless network that looks like two computers, one in front of the other. Right click on this icon and select "Connect to a network." If you don't see that icon, you can get to the same place by clicking on the Vista orb and then in the Run bar typing "network." When the results appear, click on Network and Sharing Center, and then click "Connect to a network" in the upper left corner.
A list of available wireless networks will be shown. Find the network whose WEP key you want to update, and right click on it. When the context menu appears, select Properties. When the network properties window opens, click on the Security tab if it's not already the active tab. Next to "Encryption type" it should say WEP if this connection already uses a WEP key. If it says None, click on the down arrow and select WEP.
In the box next to "Network security key," type in the new WEP key. For each number or letter you type, a black dot will appear. If you want to see what you are typing, click the box next to "Show characters." Once you've entered the new WEP key, press OK to apply the change and close the window.
(Originally published on Helium.com, Sept 2011)
Subscribe to:
Posts (Atom)