Showing posts with label computer. Show all posts

Wednesday, December 20, 2023

How to remove the hard drive from a Dell Latitude D610 laptop

Dell Latitude D610 laptop

On desktop computers, removing a hard drive can be a time-intensive procedure.  Typically you have to open the computer's case, disconnect the hard drive's data and power cables, and remove or unscrew the hard drive.  But on a laptop, where everything is smaller and more accessible, removing a hard drive is often much simpler.

To remove the hard drive from a Dell Latitude D610 laptop:

1. Locate the hard drive
With the computer powered off, disconnect all cables, including the AC power cable.  Remove the battery and place it somewhere safe.  (If you need help removing the battery, see this guide for step-by-step instructions: How to remove the battery from a Dell Latitude D610 laptop.)

Close the computer's lid and turn the laptop over so you're looking at the bottom.  You'll see several different panels and many small screws.  As you're looking at the bottom of the computer, with the fan vent in the upper right corner, the hard drive will be located in the lower right corner, next to the battery compartment.  There is a rough rectangular outline to the hard drive bay (about 3" by 5") that you can use to identify where it is.

2. Remove the screws
Two screws secure the hard drive; these are located along the right side of the hard drive bay.  In the lower right corner of the laptop, you'll see a screw that's sunken into the laptop case -- the first hard drive screw is located just above this case screw.  The second screw is located along the right side of the laptop, about three inches above where the first screw was.  Remove both screws using a small Phillips screwdriver, and place them somewhere safe.

3. Remove the hard drive
With the screws out, the hard drive can slide right out of the computer.  There's a ridged panel located along the lower right side of the laptop, between the two screws you just removed.  This panel is connected to the hard drive.  Grip this panel and slide it out of the laptop, to the right.  It may be hard to remove, but if you apply additional force, be sure to slide the panel out straight, rather than at any sort of angle, to avoid damaging the hard drive or laptop.

🛈 While you have the hard drive out, now is a good time to clean out any dust or debris that has built up in the hard drive cavity.  You can blow it out with a can of compressed air or wipe it clean with a lint-free rag.


(Originally published on Helium.com, 2011)

Saturday, February 20, 2016

How to restart a service in Windows Server 2008

Sometimes a Windows service (such as the Print Spooler) freezes up and needs to be restarted.  You can restart all services by rebooting the computer, but many times this isn't a realistic solution, especially when dealing with a server.  This article shows you how to restart an individual Windows service in Windows Server 2008.

- Click the Start button
- Select Administrative Tools from the Start menu
- Select Services
- Scroll down the list to find the service you want to restart, and click on it once
- Click Restart (in blue)

If your Start menu doesn't have the Administrative Tools option, type "services" into the Search bar and then select Services from the list of results (or press <ENTER> if it's the highlighted result).

Sunday, October 18, 2015

How to create a shared folder in Windows 7

In Windows, you can share folders to make them accessible to other users who don't have physical access to your computer.  Folders can be shared across the network, which is also useful for sending documents or images from a scanner directly to your computer.  Many scanners support SMB scanning (also called scan to folder) which generally requires the destination folder to be shared.

To create a shared folder, you first need to create the folder.  (If you've already created the folder, skip this step and navigate to that folder instead).  Click on the Windows icon in the lower left corner of the screen to bring up the Start menu, then select Computer.  From here, select the C: drive.  Right click in the white space of the C: drive and hover over New.  A submenu will appear; select Folder.  Type in a name for the folder, then press the <ENTER> key.

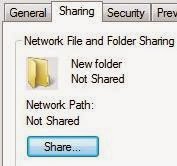
Now that you have your folder, you can share it.  Right click on the folder and select Properties.  Select the Sharing tab.  Under where it says "Not Shared," click Share.

A list of users or groups will be displayed.  Select the ones that you wish to share your folder with.  If you don't see the user or users you're looking for, click on the drop-down arrow and select them.  Or, to share the folder with everyone, click the drop-down arrow and select Everyone.  Then click on Add.

By default, anyone you add will not have the ability to change or edit files in this folder.  You can give them that permission by clicking on "Read" and selecting "Read/Write" instead.  For setting up scan to folder, you will need to give either a specific user (that you will use as the authenticating user) or everyone the ability to write to that folder.

Once you have all the users you want added and they have the permissions that you want to assign them, click Share at the bottom of the window.  Windows will begin the process of sharing the folder, which may take a little while.  When it has completed, click Done.

Tuesday, May 12, 2015

How to replace common components in a Dell Latitude CPi laptop

If you still have a Dell Latitude CPi, chances are some of the components will start to go bad soon, if they haven't already.  If you plan on replacing components rather than replacing the laptop, this article will walk you through removing and installing some of the more commonly replaced components of the Latitude CPi.  (Power the laptop off before removing any of these components.)

- Battery

To take the battery out, first turn the laptop over so you're looking at the bottom.  You'll see two slide locks, one to either side of the service tag sticker.  Each slide lock is marked with a lock icon.  The lock further to the right (with the service tag and Dell logo facing right side up) is for the battery.

To remove the battery, slide the lock to the right with one hand and slide the battery out with the other hand.  There is a contoured grip below the slide lock -- grasp that grip and slide the battery out, away from the computer.  When you slide the new battery in, it will automatically lock in place.

- Optical drive

The CD drive, DVD drive, or CD/DVD drive (depending on which one your laptop has installed) is located just to the left of the battery and comes out the same way.  Slide the other lock to the left and pull the optical drive out using the recessed grip.  (If you're going to dispose of the drive, make sure you didn't leave a disk in it.)  To install a new drive, slide it all the way in until it locks.

- Hard drive

As you're looking at the bottom of the laptop with the Dell logo facing right side up, the hard drive will be located to the right.  You'll see a thin rectangle on the right edge with two screws -- remove these screws with a small Phillips screwdriver and slide the hard drive out using the contoured grip.  When installing a new drive, slide it into place and then secure it with the screws.

- RAM

If you need to remove one or both memory sticks from the CPi, first remove the RAM cover.  This cover is located just above the Dell logo, and it has a triangular arrow pointing to the right.  Slide the left side of this cover to the right, while at the same time lifting up on the right side of the cover to release it.  With the cover off you'll see the two RAM cards.

To remove the RAM, release each of the side clips holding it in place by pushing them to the side, away from the memory card.  Push the clip on the left farther to the left, and the clip on the right farther to the right.  (A small flathead screwdriver with a thin blade is ideal for doing this.)  Once each clip has been released, the RAM stick will pop up and you can pull it out.  Follow the same procedure to remove the other RAM stick.  It doesn't matter which order you remove or install the RAM.

When you install new RAM, gently slide the memory card into its slot at about a 45-degree angle, until it's sitting straight and you can't see its gold contacts.  Each card is keyed so you can only put it in one way.  Then gently push the card down until it is horizontal and the two clips snap into place.  To reattach the cover, slide it on from the right side and push it left until it slides all the way on.

(Originally published on Helium.com, April 2012)

Friday, May 1, 2015

How to improve performance in Windows XP

There is a lot you can do with Windows XP, including tweaking its performance.  Whether your computer's performance has slowed down over time or you just want to give it a little kick, here are some tips for improving performance on a Windows XP computer.

- Performance Options

Windows XP has a group of settings called "Performance Options" that give users a bit of control over how the operating system uses memory.  To access these settings, right click on My Computer and choose Properties.  Under the Advanced tab, click the Settings box under "Performance."

In the Visual Effects tab, select "Adjust for best performance."  This setting will get rid of animated windows, menu shadows, and other frills, leaving more system resources available to run applications and programs.

Next, go to the Advanced tab.  For both "Processor scheduling" and "Memory usage," make sure the radio button next to Programs is selected.  These two settings will make sure that more memory is set aside for the applications you have open than for background programs or other processes.

Under "Virtual memory," click the Change button.  This is where you can edit your page file settings.  Set the page file size (Initial size) so that it is at least as large as the amount of RAM you have installed.  For example, if your PC has 2 GB of RAM, make sure the page file is at least 2 GB.  You may have to increase the maximum size as well.

The page file is where Windows stores open programs that it doesn't have room for in RAM.  The page file takes longer to access than RAM does, but a slow page file is better than no page file.  You might have to reboot your computer in order for the new settings to take effect.

- Disk Cleanup

Disk Cleanup removes unnecessary temporary files from your hard drive.  To access Disk Cleanup, right click your C: drive in My Computer and choose Properties.  Then click the Disk Cleanup button toward the middle of the window.  Once Disk Cleanup opens, choose which file types you want to get rid of.  (The program will show you how much space you will reclaim by deleting each group.)  Once you have selected the files to remove, click OK to begin the cleanup.

- Startup programs

Many programs are set to run when your computer boots up, whether you actually want them to or not.  To view the list of startup programs, click Run on the Start menu and type "msconfig" and then press <ENTER>.  When the System Configuration Utility loads, go to the Startup tab.  Any program with a check next to it is a program that launches on startup.  If you see any programs that you don't want (or need) to automatically load, remove the check mark.  Click OK when you are done.

The next time you boot your computer, you will get a message about selective startup.  Check the box that says not to display that message in the future and click OK.

Reducing the number of programs that launch when Windows launches will make your system load faster and save more memory for programs that you choose to run.


With these tips and tweaks, your Windows XP computer should become quicker and more responsive.  If you are still having sluggishness issues or Windows doesn't respond as quickly as it should, you might need to add more RAM.

(Originally published on Helium.com, February 2010)

Tuesday, April 21, 2015

How to maximize the life of your hard drive

Even though solid state drives (SSDs) are the new "it" thing, many people still have regular old EIDE or SCSI hard drives with movable parts.  These hard drives, like any mechanical device, will degrade and eventually break down over time.  However, there are some things you can do to prolong the life of your hard drive.

* Error-checking

Windows has a handy utility called Error-checking that can scan your hard drive for bad sectors and other problems and attempt to fix them.  This process takes a while, but it should be done on a regular basis -- once a month is a good interval.

To run Error-checking, open My Computer and right click on your hard drive.  Select Properties, then go to the Tools tab.  Click the Check Now button under Error-checking, and in the box that appears, put a check next to both options.  When you click Start, the system will tell you that the scan can only be run when your computer is restarted.  Click Yes, and the next time you reboot your computer, Error-checking will run.  Plan to run it at a time when you won't need your computer for at least an hour or so.

* Use partitions

Partitioning your hard drive not only makes good organizational sense, but it can help your hard drive live longer.  By putting similarly-grouped files in the same partition, you can keep the read/write heads of the hard drive from wandering all over the disk to find or place data.  For example, you could have one partition for operating system files, one partition for work or professional files, and a third partition for everything else.

Partitions can be created and managed through the Disk Management snap-in (Start > All Programs > Administrative Tools > Computer Management, then click Disk Management from the list on the left).

* Defragment

For the same reason you should make use of partitions, keeping your hard drive defragmented can also alleviate some of the work the read/write heads have to do.  If a file is in one piece instead of three or four, the hard drive's arm only has to go to one place to retrieve that file.  The less you can have your hard drive parts move, the better.

Windows comes with a defragmentation utility (the Disk Defragmenter, located in the System Tools folder or in the Tools tab of the hard drive's properties screen), and it should be run at least once a month to keep your files from getting too broken up.  If your hard drive is partitioned, run the defragmenter on each partition.

* Disable the page file

Windows uses an area of the hard drive as extra RAM and calls it the page file.  If you have plenty of RAM and you don't need the extra virtual memory, you can disable the page file to cause less wear and tear for the hard drive.  To disable the page file, right click on My Computer and select Properties.  Under the Advanced tab, click the Settings button in the section labeled Performance, then go to the Advanced tab in the new window.  In the Virtual memory section (toward the bottom) click Change, and then click the circle next to "No paging file" and click Set to make the change.  Then just click OK to get out of the various windows.  (You may have to restart your system for it to take effect.)

If you find your computer running slower or locking up, or if you start getting memory errors, simply go back in and turn the page file back on.  A good page file size is about one and a half times the amount of RAM you have.

* Use other media for long-term storage

For back-ups, music libraries, or other forms of long-term storage, use alternative storage media rather than your main hard drive.  Some storage media you could use include DVDs, tapes, flash drives, and external SSD hard drives.

(Originally published on Helium.com, May 2010)

Friday, March 13, 2015

Software Review: CCleaner

CCleaner, created by the folks at Piriform, is a versatile disk cleanup utility that can perform many different functions.  It is free to download (though donations are encouraged) and does not take up a lot of hard drive space.

At its most basic, CCleaner can be used to remove temporary Internet and Windows files from your computer, such as cookies and recently opened documents.  It will also delete temporary files from many different applications (if you want it to) such as word processor programs, web browsers, antivirus programs, or other third-party Windows programs.

One advantage of CCleaner is how customizable it is.  You can choose exactly which types of files to remove (cookies, recent documents, saved form information, etc.).  You can also choose which programs to remove temporary files from -- CCleaner will list any programs you have installed that it can "cleanse."  Under the advanced options, you can even specify certain cookies you want to keep (for websites you visit often) or folders to exclude from cleanup.  If you have sensitive data, CCleaner can be set up to use secure deletion, where it will overwrite any deleted data to prevent recovery.  Depending on how secure you want it to be, you can have it overwrite the data up to 35 times.

In addition to its disk cleanup functions, CCleaner can also act as a sort of small-scale management console for your PC.  From CCleaner, you can uninstall old programs, manage system restore points, and delete programs from your startup menu.  One nice feature of CCleaner is that it displays basic system information that users sometimes need to find, including operating system (and which service packs are installed), processor type and speed, and the amount of RAM your PC has.

CCleaner works for a large variety of programs.  A few examples are Norton Antivirus, Microsoft Office, and Adobe's Flash Player.  It can recognize and clean virtually any web browser, and will even remove temporary files from some browser toolbars (such as the Yahoo! Toolbar).

CCleaner is very user-friendly -- every type of file or program is shown with a check box, so you can choose exactly what to delete and what to skip.  It runs quickly (usually finishing in a matter of seconds) and it is fairly comprehensive.  I sometimes run ATF Cleaner afterwards, to see what CCleaner missed, and every now and then ATF will find a few files left behind, but for the most part CCleaner does a thorough job.

The program can be set to automatically check for updates, and depending on the options you select when you install it (which can be changed later) it can be launched from the desktop, Start menu, Recycle Bin, or from inside your browser.  You can have it run on startup, and you can also have it shut the computer down after it finishes.

CCleaner is one of the best disk cleanup utilities I have come across.  It is lightweight, comprehensive, and highly adaptable.

(Originally published on Helium.com, October 2009)

Friday, January 30, 2015

How to restart the print spooler service in Windows XP

There are many different reasons why you may not be able to print from your computer. Sometimes, if everything else is fine and you can't figure out why you can't print, you may just need to restart your print spooler.

The print spooler is the program that takes your print job and sends it to the printer. If this program freezes or gets stuck on a certain job, you can restart it to get your computer printing again.  Here are instructions for how to restart the print spooler in Windows XP.

Press the Start button, and when the Start menu appears, click on Run. (If you don't see the Run option, skip to the next paragraph). In the Run box, type "services.msc". The Services window will open, showing all of the services that are currently installed on your computer. Some of these services are running and some have probably been stopped.

If you don't have the Run option on your Start menu, you can get to the Services window a couple of different ways. You can right click on My Computer from the Start menu (or from your desktop) and select Manage, then when the Computer Management window appears, click on Services and Applications in the left pane of the window and then in the right pane double click on Services. Another way to get to the Services window is to go through the Start menu; click on All Programs, then Accessories, then Command Prompt. When the Command Prompt window opens, type "services.msc" and then press <ENTER>.

Scroll down the list until you see "Print Spooler". Click on it to highlight it. A couple of options should appear in the middle of the window. One of these options is "Restart the service". (If you don't see the "Restart" option, then your print spooler is currently stopped for some reason. Click on the "Start" option to run the print spooler, then try to print.)  Click on Restart. A window with a status bar will appear, as Windows attempts to stop and then restart the print spooler. Once this action has been completed, the status bar window will disappear.

You can now close the Services window and try to print again. Hopefully your print job will print without incident now, but if you still have an issue with printing, you can rule out the print spooler as the cause of the problem.

(Originally published on Helium.com, January 2014)

Wednesday, December 24, 2014

How to replace the power supply in a desktop computer

The power supply is one of the most common components to fail inside a desktop computer. If you don't mind turning a screwdriver, you can replace a bad power supply yourself and save on repair costs.

Before purchasing a replacement power supply:

- Make sure to buy a power supply that is rated for at least the same wattage as your current power supply.
- Verify that the new power supply has all of the necessary connectors that your current one has. You can either check this visually by looking at the connectors that you have, or by making sure your computer is listed as one of the models that the new power supply is compatible with.
- Make sure the new power supply will fit inside your computer's case. (If the new power supply is compatible with your computer, that won't be a concern.)

To install the new power supply:

- Turn your computer off and unplug it from its power source.
- Unplug all of the cables leading from your computer, including the power cable.
- Open the computer's case. (If you're not sure how to do this, you can probably look it up online. Most computers either have screws in the back that come out, a side panel that slides off, or they open up like a clamshell.)
- Disconnect all of the cables leading from your power supply. Note what component each connector plugs into. You should have connectors for your fan(s), hard drive(s), optical and/or floppy drive(s), motherboard (may be one or two connectors), and the front power switch.
- Unscrew the power supply from the system case and remove it.
- Set the new power supply in the case facing the same way as the old power supply and screw it in.
- Attach all of the connectors. (You may have more connectors than components, but make sure each component that was connected before is connected again now.)
- Close the system case and reattach any screws.
- Plug the power cable into the power supply and then into the wall outlet.
- Reattach all other cables.
- Make sure the power switch on the back of the power supply is on.
- Make sure the voltage switch on the back of the power supply is set to the correct voltage (115 volts in the United States).
- Turn on the computer and verify that it boots up correctly.

(Originally published on FixYa.com, January 2011)

Saturday, September 20, 2014

How to disable simple file sharing in Windows XP

Windows XP allows for two different types of file sharing: "normal" file sharing and simple file sharing.  Simple file sharing is a mode that often comes enabled by default, which makes sharing files and folders easier, but also limits how you can control and manage sharing options.  If you wish to disable simple file sharing on your Windows XP computer, follow the steps outlined below.

Open up a folder on your computer and click on Tools on the menu bar.  When the drop-down menu appears, click on Folder Options.  Then go to the View tab.

In the middle of the window will be a list of settings.  Scroll down toward the bottom of the list, until you see the setting labeled "Use simple file sharing (Recommended)."  If simple file sharing is enabled, there will be a check mark next to this line.  Click on the check mark to remove it, then click the OK button at the bottom of the window.  Your computer will no longer use simple file sharing, and you'll have more control over your files and folders that are being shared.

(Originally published on Bubblews.com, November 2013)

How to enable simple file sharing in Windows XP

Simple file sharing is an option that you have in Windows XP to make file sharing across a network easier to set up and manage.  For a small network, simple file sharing reduces the number of options and settings, and just allows you to easily share files and folders.  To turn on simple file sharing in Windows XP, follow the steps below.

First, open up a folder on your Windows XP computer.  It can be any folder you want.  Then, click on the Tools option on the menu bar at the top of the folder window.  (If you don't see the menu bar, press the <ALT> button.)  From the Tools menu, select Folder Options.

A new window will open.  In this window, go to the View tab.  Here you will see a long list of settings and options.  Scroll down the list to the very bottom.  Right above "Icon Cache Size" you should see a setting that is labeled "Use simple file sharing (Recommended)."  Click on the box to the left of this setting so that a check mark appears there.  Then click the OK button to close the window and save the change.  Simple file sharing is now enabled on your computer.

(Originally posted on Bubblews.com, November 2013)

Saturday, August 30, 2014

How to run hardware diagnostic tests on a Dell Latitude D610 laptop

Dell Latitude D610 laptop
Like many Dell computers, the Latitude D610 comes with some built-in hardware troubleshooting tools that you can use to try to narrow down what's causing a specific problem -- and hopefully even fix it.  The hardware diagnostics tests for the D610 can be run on startup, and they are a very good troubleshooting resource.

Follow these steps to run the built-in troubleshooter for your Dell D610 laptop:

First, shut down the computer using the standard method for the operating system you are running.  (For example, in Windows XP go to the Start menu and select Shut Down.)  Wait for the computer to fully power down.

With the computer off, hold down the <F12> key and then press the power button to turn the computer on.  The Dell logo will appear, and then a text menu will be displayed with various hardware options.  Scroll down to the last option, Diagnostics, using the arrow key and then press <ENTER>.

Various hardware tests will begin running.  The results will be displayed (either Pass or Fail) and if any component fails, a box will pop up saying "Error detected, continue testing?"  To continue, press <Y>; to stop the test at this point, press <N>.  To retry that specific component test, press <R>.  The computer will emit a series of beeps if an error is detected.

If you get to the point where the monitor colors are tested, various colored bars will be displayed on the screen and you'll see a message that says "Were color bars displayed?"  Press <Y> if you see them or <N> if you don't.

If you make it through the test, a message will be displayed saying "Booting Dell Diagnostic Utility Partition."  This is the program that allows you to run individual and more specific tests.  Press any key to begin.

At this point the system will switch to a graphical interface where you can use the touch pad and buttons to control it.  There will be options for Express Test (a quick check of components), Extended Test (a longer, more intensive check), Custom Test (where you can pick which specific component or components to check), and Symptom Tree (where you can choose which tests to run based on the problems the computer is exhibiting).

Pick the test you want to run, then follow the prompts and wait for the test to complete.  If any error codes are displayed, write them down for reference (and to give to Dell's tech support if necessary).  These tests are very self-explanatory, and once you finish one you can go back and run some others if you wish.

To exit out of the troubleshooter when you are finished, just close each open window by clicking on the X in the upper right corner.  Once you close the Main Menu, the laptop will begin the normal boot process and the operating system will load.


(Originally published on Helium.com, October 2011)

How to view the network map in Windows Vista

One big improvement Windows Vista makes over Windows XP is the ability to graphically view your network and all of the computers and devices on it. This graphical representation is called the network map, and you can use it to find computer names, IP addresses, and other information. To view the network map on a Windows Vista computer, follow the steps below.

Click on the Vista orb (the icon with the round Windows logo) in the lower left corner of the screen. The Start menu will appear right above where you clicked. In the Search bar on the Start menu (the text field where the cursor is that says "Start Search") type the word "network". In the results that appear at the top of the Start menu, click on Network and Sharing Center.

The Network and Sharing Center will open in a new window, and at the top of the screen will be a brief representation of your network that will probably consist of your computer, the router or gateway that your computer connects to, and a globe that is labeled "Internet." To view the full network map, click on the "View full map" link above and to the right of these icons. The network map will appear (though it may take a few seconds to load). Most, if not all, of the computers and other network devices connected to your network should be represented on this map, connected by lines or dotted lines. You may see routers, switches, printers, and other devices, depending on how large your network is. Each device will be labeled with its name or by a generic label (such as "Switch").

Some older computers and other network devices may show up at the bottom of the network map, or not at all. This is likely because those devices don't have the necessary LLTD (Link Layer Topology Discovery) protocol installed. If you can't view the network map at all, check to be sure Network Discovery is enabled on your PC.

(Originally published on Helium.com, Nov 2011)

Monday, August 25, 2014

How to update a WEP key for a Windows Vista PC


Many wireless networks, especially older ones, use WEP encryption to protect the network from intruders and strangers.  Once you've set up a wireless connection in Windows Vista with a WEP key, you can automatically connect to that network without having to re-enter the key every time.  But if the WEP key is ever changed (either by you or someone else) you'll need to update the WEP key on your computer so that you can reconnect to that network.

In the system tray in the lower right corner of the screen there should be an icon for your wireless network that looks like two computers, one in front of the other.  Right click on this icon and select "Connect to a network."  If you don't see that icon, you can get to the same place by clicking on the Vista orb and then in the Run bar typing "network."  When the results appear, click on Network and Sharing Center, and then click "Connect to a network" in the upper left corner.

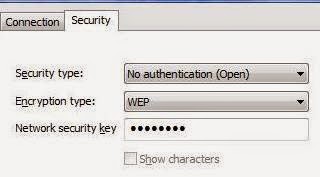
A list of available wireless networks will be shown.  Find the network whose WEP key you want to update, and right click on it.  When the context menu appears, select Properties.  When the network properties window opens, click on the Security tab if it's not already the active tab.  Next to "Encryption type" it should say WEP if this connection already uses a WEP key.  If it says None, click on the down arrow and select WEP.

In the box next to "Network security key," type in the new WEP key.  For each number or letter you type, a black dot will appear.  If you want to see what you are typing, click the box next to "Show characters."  Once you've entered the new WEP key, press OK to apply the change and close the window.

(Originally published on Helium.com, Sept 2011)

How to update a WEP key for a Windows XP computer

Wireless networks use many different protocols for security and encryption.  One of these protocols is WEP encryption, which requires that any device connecting to a wireless network provides the correct WEP key.  If a device does not have the correct key, it won't be able to connect.

If you've changed your wireless network's WEP key and you need to update that information on a Windows XP computer, follow the steps below.  Your computer won't be able to connect to the network until you input the new WEP key.

If you see the icon for wireless networking in the lower right corner of your taskbar (it looks like a computer with radio waves or sound waves coming out of it) you can right click on that icon and then select Open Network Connections.  If you don't see that icon, you can get to the same place by clicking on the Start button and then right clicking on My Network Places and choosing Properties.

In the Network Connections window, right click on Wireless Network Connection and choose Properties.  The Wireless Network Connection Properties window will open.  In this window, click on the Wireless Networks tab across the top.  In the box in the middle of the window, a list of all your saved networks will be displayed.  Click on the network whose WEP key you need to update and then click the Properties button.

In the connection's properties window, there will be a text field labeled "Network key."  This field is where the current WEP key is stored.  To replace it with the new WEP key, simply click on the text field to erase the characters there and then type in the new WEP key.  Once you've typed the WEP key in, you'll have to type it in again next to "Confirm network key."

After you've entered the WEP key and confirmed it, click OK to close the properties window, and then click OK again to close the wireless properties window.  Once these windows are closed, the new WEP key will be saved on your computer for the next time you connect to that network.

These instructions are written for Windows' Wireless Zero connection utility, which is built into Windows XP.  If you are using a different wireless connection client (such as Dell's Wireless Configuration Utility) the steps for updating the WEP key will vary.  See your software's documentation or user manual.

(Originally published on Helium.com, Oct 2011)

Tuesday, August 19, 2014

How to create a shared folder in Windows XP

If your computer is connected to a network, even a small home network, a shared folder is useful for several different things.  You can scan images or documents to it from a scanner, you can share files with other computers, and you can make resources available for other users on your network.  Sharing some folders is also useful for doing backups, if you perform them manually or do them from another computer.

Creating a shared folder on a Windows computer is typically easy to do, and the steps are similar throughout most Windows operating systems.  This article will guide you through the necessary steps for creating a shared folder in Windows XP.

First, you'll have to figure out where you want to put the folder.  Avoid putting it on the desktop if possible, both because Windows can be finicky with desktop folders, and because it helps to avoid clutter.  A good place for your shared folder is right in the root of your C: drive.

Go to My Computer, either from the link on your desktop or the link on your Start menu.  Then navigate to the drive or directory where you want to put your folder.  (To put it in the C: drive root, double click on the C: drive.)  Right click on an area of empty space and select New, then Folder.  You'll be prompted to name your folder, and once you've done that, press <ENTER>.

Now that you've created the folder, you just have to share it.  Right click on the folder, select Properties from the menu that appears, and then select the Sharing tab in the window that opens.

Windows XP uses two kinds of sharing: "regular" file sharing and simple file sharing.  Depending on which kind of sharing your computer is configured to use, the sharing screen might look a little different, but the steps to enable it are basically the same.

If your Windows XP computer is configured for simple file sharing, you should see a screen that looks like this one:


If simple file sharing is disabled on your PC, you should see a screen that looks like the one below:


(Instead of either of the above examples, you may see a message that advises you of the risks of sharing the folder.  If you see this message, you will need to click on the option to enable sharing for this folder in order to continue, but you should read up on the risks of choosing that option first, or talk to your network administrator.)

Select the option for either "Share this folder on the network" or "Share this folder," depending on which screen you see.  You'll then be prompted to enter a share name for this folder, which is how the folder will appear on your network.  This field will automatically populate with the folder's name, but you can change it if you wish.

If your computer is using simple file sharing, check the box marked "Allow network users to change my files" (unless you only want the files in this folder to be read-only) and then skip the following two paragraphs.  Otherwise, follow the steps in the next two paragraphs to manually set up the permissions for this folder.

To configure the permissions for your share folder, click on the button toward the middle of the screen labeled Permissions.  When the Permissions window opens, you can choose to either allow everyone to modify the contents of the folder, or just a selected user.  If you choose just one user, then wherever you access this folder from (such as another computer, or a scanner) the person or device that will be accessing the folder will need to know that user's username and password.  If you choose to allow everyone permissions to change this folder's contents, then you can use any valid username and password to access the folder.

To choose everyone, simply highlight Everyone in the box at the top of the screen and then select the box under Allow, next to Full Control, then click OK.  To choose a specific user, either highlight that user in the box at the top (if their name appears there) or click Add, type their name in, and click OK to add them to the list.  Then, with that user highlighted, select the box under Allow, next to Full Control, and then click OK.

Now your folder is created and shared, and can be accessed from other parts of your network.  One important thing to remember when sharing a folder on a Windows network is that the other computers or devices should all be in the same workgroup as the sharing computer, or at least have access to the same workgroup.

Tuesday, July 1, 2014

How to Fix a Slow Computer

There is nothing more frustrating than a slow computer.  Whether it's trying to load a web page, open a folder, or even just shut down, a computer that runs like molasses can really try your patience.

Computers can be slow for many different reasons, and it can sometimes be difficult to figure out why.  But by using the tips below, you can troubleshoot your slow computer and hopefully get it running up to speed again.

- For slow web browsers

Just about every web browser uses add-ons, plug-ins, or other piggyback programs that add functionality or offer other advantages.  However, these add-ons can sometimes drag your browser's performance down, and occasionally even slow it to a crawl.  If your web browser is slow, disable all of your add-ons and see if you notice a difference in speed.  If so, enable the add-ons one by one until you can figure out which one is causing the bottleneck, then give it the axe.  Google's toolbar add-on is notorious for bogging down web browsers.

If your browser still seems slow, you may want to try a different browser altogether.  Chrome and Opera are two alternative browsers that are both free to download.  Try one or both of them, and see if they are faster than what you're using now.

- For slow startup

Many programs will try to configure themselves to launch when Windows boots up.  For some programs, this can be a nice feature, but for others it's just a waste of memory and system resources.  The more programs you have set to load on startup, the slower your system will run.

There are two main places to check to see which programs automatically run every time you turn your PC on.  The first is the Windows Startup folder, which you can view from the Start menu (Start > All Programs > Startup).  If you see any programs in this folder that you don't want to run automatically, just delete them.  Their shortcut will be deleted from the Startup folder, but the program itself will remain installed.

Another, more comprehensive, place to look is the System Configuration Utility.  Type "msconfig" into the Run bar or Search bar and when the application opens up, go to the Startup tab.  The programs here will be listed with abbreviated names, but you should be able to get a good sense of what each one is.  Many files listed here can safely be unchecked, such as GoogleUpdate or AdobeARM -- just be careful not to uncheck critical system files.  Once you've made your changes, click Apply or OK, and the next time you turn your computer on, those programs you selected won't start up.  You should notice a difference in startup time, and hopefully in general system performance as well.

- For slow speeds during normal operation

If you notice your computer slowing down suddenly during use, it could be any number of programs causing the drop in performance.  Look in the Task Manager to see which programs or services are eating up your resources; scan the "CPU" and "Mem Usage" columns and look for files with much higher numbers than the programs above and below them.  (To open the Task Manager, right click on an empty area of the taskbar and select Task Manager.)

Anti-virus or anti-spyware programs can bog your system down periodically.  You'll notice a drop in performance if either of these applications is running a scan or downloading updates.  One way to combat this slowness is to schedule scans and updates for times when you don't use your computer, such as late at night or early in the morning.  The same can be done with Windows' automatic updates, which also account for occasional drops in performance.

If the files you're seeing in the Task Manager are a different type of program, check that program's preferences or options to see if it has any settings for automatic updates or other functions that would cause it to use up resources when you're not using it.  Some programs also stay resident in memory even after they've been closed, which means the memory that they claimed can't be reallocated to another program.  If you see files in the Task Manager for a program that you've already shut down, highlight those files and click End Process to free up that memory.

- For slow hard drives

Hard drives come in varying speeds, and even a fast hard drive can get bogged down as it starts to get close to maximum capacity.  Run a disk cleanup program like CCleaner to erase all of those unnecessary temporary files, setup files, and cookies that can slowly take over your hard drive.  Windows even comes with its own utility, aptly named Disk Cleanup, that will do an adequate job of erasing unneeded files.

Videos, pictures, and songs are notorious for taking up space.  If possible, offload your media files onto a DVD, CD, or external hard drive to free up space on your main drive.  You can also go into the Control Panel and, using the Add or Remove Programs applet, delete old programs that you no longer use.

Once you've freed up some hard drive space, run the Windows Disk Defragmenter (or another defragmenting program) to reorganize your drive and make some sense out of all that mess.  Your hard drive will now be more streamlined and have better access times, which means better performance.

(Originally posted on Helium.com, January 2011)

Monday, June 30, 2014

How to Fix Your Computer Yourself

Computers are remarkable devices. At their best, they can do amazing things. But when they break down, they can make you want to pull your hair out. Here are some tips to try for common computer problems, before calling in a professional:

- Sluggishness

If your computer is running slowly -- taking a long time to open applications or switch between windows, for example -- there are many things you can do to try to speed it up. First, unclutter your desktop by removing old or unused shortcuts. (Deleting the shortcut does not delete the actual program.) Then run Disk Cleanup to remove unnecessary temporary files, and empty your recycle bin to free up some more disk space. (In Windows XP and Vista, you can access Disk Cleanup by right-clicking on your hard drive in My Computer or Computer and choosing Properties.)

Next, defragment your hard drive to better organize your files. Defragmenting will usually take a while (probably most of an hour) and you shouldn't use your computer while it's running, but if the hard drive hasn't been defragmented in a while, running the defragmenter can possibly result in a noticeable increase in system performance. To run the defragmenter in Vista, simply type "defrag" into the Windows search bar. In XP, it can be found under the System Tools folder (All Programs > Accessories > System Tools > Disk Defragmenter).

If your computer is still slower than you think it should be, you may have a virus or other malware -- run anti-virus and anti-spyware scans. (See the next section.)

- Virus or spyware

Viruses and other malicious programs (spyware, adware, or malware) can infect your computer and do nasty things. Sometimes you'll know when your computer is infected; other times you won't.

If you believe your computer is infected, run both an anti-virus and anti-spyware scan. Delete or quarantine any malicious files found, then reboot your computer and run the scans again. If the same files keep popping up, the virus has hidden itself in your computer's registry and it will keep reinstalling every time you remove it. If this is the case, have a professional clean your system.

You should have both an anti-virus and anti-spyware program installed on your computer. Most people have only an anti-virus program, which is good to have but will not keep out all unwanted programs. Several free anti-spyware programs can be found online, including Ad-Aware and Spybot.

- Device or memory error

Sometimes Windows will crash or freeze up because of an error. Usually when this happens, it will give you some indication of what caused the problem. If it's a device error and Windows tells you which device is causing the problem, you may have a faulty device, or it may simply be a software issue. Try reinstalling the device driver, or downloading a new driver from the manufacturer's website.

If the error is an application error, you need to figure out which application is to blame. Usually when you get application errors it's right after you've installed a new program. Uninstall your most recent program (through the Control Panel) and see if the error goes away. If it doesn't, you may be able to use System Restore to load previous settings that didn't cause that error.

Memory errors can sometimes be application errors as well. When a memory error occurs, Windows shows you the address in memory where the error took place. Write this address down - if the same address keeps popping up, you most likely have faulty RAM. Either replace your RAM sticks yourself or have a professional do it (usually only for a modest fee).

If the memory address constantly changes, you most likely have an application error. Follow the steps listed above for application errors.

- Audio or video problems

For audio or video trouble (blank screen, no sound, distorted sound, etc.) the problem might just be a loose cable. Shut the computer down, then disconnect and reconnect all of your audio or video cables - these are usually the monitor's data cable (going to the computer) and power cable (going to the outlet or surge protector) and wires for any audio devices, including speakers, headphones, microphones, or headsets.

If the problem doesn't go away, it may be a damaged or faulty device. For cheap devices like headphones, try replacing them to fix the problem. In rare cases, audio and video problems can be caused by intermittent electrical problems with the motherboard, for which you will probably want a professional's help.

- Network connection problems

Network issues are usually simple settings adjustments, but searching through the settings to find the right one can be a real bear. It's often easier to pay someone else to do it. But first, you might want to try reconnecting all of your networking cables - Ethernet or coaxial cables, and any cables leading to or from your router, switch, or hub. Also, if you are running a home network, make sure all of your computers are in the same workgroup and make sure they all have File and Printer Sharing enabled.

For an issue scanning from a dedicated scanner or multi-function printer, check your firewall to be sure it's not blocking the scanning attempt. If you can print to the device (or ping it, or otherwise interact with it from your computer) but you can't receive scans from it, it's likely that some program is blocking the transmission. If it's not your firewall, it may be a security program, or a hardware device, such as your router.

If you can connect to other devices on your home network, but can't connect to anything outside your network, try rebooting your router. It will likely be either a problem with the router itself, or with your Internet Service Provider (ISP).

If you've tried the solutions listed above and haven't been able to resolve the problem, it may be time to call in a professional. Find a person or company with a good reputation and reasonable rates, and if you have to leave your computer with them, make sure you know up front how long the repairs will take.

(Originally posted on Helium.com, December 2009; updated with new information)

Saturday, June 21, 2014

Computer review: HP Pavilion a450n desktop computer

I bought my HP Pavilion a450n desktop computer in the spring of 2004, soon after it first came out. I overpaid heavily for it, because I didn't know any better at the time, but it came well-stocked with Microsoft Office, an HP all-in-one printer, and a decent monitor. It's been a great computer, and I still use it today, over 10 years later.

The a450n might be a little slow by today's standards, but it still runs fast and handles multi-tasking easily. It came pre-installed with Windows XP, a bunch of HP monitoring and diagnostic tools, and HP's Recovery Software Suite. That recovery software (pre-loaded so you only have to hit a button on startup to run it) has saved my computer twice now from being ravaged by viruses. The software seamlessly (and quickly) restores the computer's settings to what they were at the date of setup, including drivers and installed programs. It works rather like Windows' System Restore, but more reliably. Unfortunately this means you must reinstall any third-party programs (like Microsoft Office), updated drivers, and Windows service packs, but this is a small price to pay to have your computer back.

I have had no issues with hardware since buying this computer. It features a Pentium 4 3.0 GHz CPU, 150 GB hard drive (with 5.5 GB partitioned off for the recovery software), 512 MB RAM, a CD writer/DVD writer drive as well as a CD reader drive, and a generic-looking but highly functional keyboard.

Other than the two virus infections and a problem with a McAfee security program, my a450n has had no problems at all until recently.  
It started having some hard drive issues over the past few months, which I think is understandable, considering that the hard drive is a decade old, and the two CD-ROM drives don't always work.  (They worked fine for the first seven or eight years, which is longer than most people would probably own the computer.)

Over the years, I upgraded the monitor, keyboard, mouse, printer, and RAM (from the 512 MB it came with to 1 GB) but the computer itself is still chugging along robustly. I use the HP keyboard for my second computer now, and -- other than a few stains -- it looks and acts the same as it did when it was brand new.

The computer is designed in a tower layout. The rear of the computer contains more ports than I've needed so far, and the front contains additional ports which have come in handy because of their easier accessibility - multiple USB ports, three different audio jacks, an SD port, a FireWire port (which I've never used) and even a 3.5" floppy drive.

The HP Customer Care website is very user-friendly -- you can find product information, updated drivers, instructions on upgrading components, and information on ordering extra recovery CDs. HP is a highly customer-oriented company, and they even offer computer users free online classes on a variety of subjects.

HP is a well-respected name in computer technology, and with the Pavilion a450n, they proved they deserve it.


(Originally published on Helium.com, July 2009)

Thursday, June 19, 2014

Computer review: Acer C720 Chromebook

I'd been hanging on to my Windows XP laptop for far too long.  The hard drive was finally starting to die, and with XP support going by the wayside, it was time to bite the bullet and purchase a new laptop.  But I didn't have a lot of money to spend, so my options were limited to lower-end Windows 7 or 8 laptops or refurbished laptops.  Or so I thought.

While browsing through laptops on Amazon.com, I came across a few Chromebooks.  I'd heard of Chromebooks before, when they first came out, and thought it was a neat idea but had never used one.  I'd never really considered buying one, until I saw the Acer C720 Chromebook.  The C720 caught my attention right away.

The Acer C720 has impressive features, especially for a laptop that's under $300.  It comes with a wireless adapter that can handle up to Wireless-N speeds, an anti-glare screen, a solid state (SSD) hard drive, an HDMI port, built-in Bluetooth, a webcam, and the coup de grace for me -- a battery that lasts up to 8.5 hours.

I've never had a laptop with a battery that lasted much over an hour, so 8.5 hours immediately got my attention.  After shopping around a little bit more, I made my decision and bought the C720 for $199.

I've had this laptop for about eight months or so now, and I am still very much impressed with it.  It's not everything I thought it would be, but it's still pretty darned good.  The battery did indeed last 8.5 hours -- until I charged it the first time, and since then I've been getting from about 5 to 8 hours out of it in between charges.  It's not the 8.5 hours promised, but even 5 hours is still incredible and I have no complaints about that.  It's a nice feeling when you see the battery meter showing red for critical battery life, and when you look at the details you see that you still have 43 minutes left.

For such a small laptop, it's very durable.  It fell from about five feet onto a hard tile floor and no parts were damaged.  On my old Gateway laptop, a plastic corner chipped off just from normal use, and yet this Chromebook suffered no damage at all after smashing into the floor.

Being a Chromebook, the C720 uses the Chrome OS rather than the more traditional Windows, Mac OS, or Linux operating systems.  Chrome OS is geared more toward getting online (and playing and working there) than other systems.  For the most part, everything runs through the Chrome web browser.

If you're not used to Chrome OS (like me) this shift can take some getting used to.  But it is a well-designed operating system, and it certainly has less glitches than Windows.  In the month I've been using the C720, it has only hung up once, requiring a reboot.  My old Windows laptop, even before it started having hard drive problems, was having a good week if it only crashed once.

The file management system in Chrome is vastly different from the Windows file system.  There is no real "desktop" to speak of, for example, but there is a task bar at the bottom of the screen.  A Chromebook isn't designed for working on files stored locally, so getting around on the hard drive can be a little cumbersome -- definitely not as user-friendly as it is in Windows.  But Chrome OS gives you the ability to work off of documents and files that you store on Google Drive, in the cloud -- and the C720 comes with two years of free storage space on Google Drive, up to 100GB.

The C720 is small, which is great for portability.  If you're used to a bigger laptop, the C720 will be quite an adjustment.  The screen is only 11.6" and there is no number keypad.  I much prefer a bigger screen, but I've gotten used to the smaller screen since I've been using it.  It is a high-quality screen -- it's viewable from many angles, and it does a good job of eliminating glare.

One of the nicer features of Chrome OS is how lightweight and simple the operating system is.  It doesn't require a lot of system resources, so the processor and RAM can devote themselves to running your applications.  When you turn the C720 on, from being completely off, it's booted up in a matter of seconds.  Having been a Windows user for years, I immediately scoffed at that claim, but it is completely true.  Less than 10 seconds from opening the C720's lid, I can be online and working.

Chrome OS does a lot behind the scenes.  It automatically downloads updates, which are applied the next time you reboot, and it controls the anti-virus and anti-malware features on its own.  You can use Google Docs to open many different kinds of files.

As far as hardware is concerned, the C720 is heavily-loaded for a $199 price tag.  It has a 16GB SSD, 2GB of DDR3L SDRAM, an Intel Celeron 2955U processor (which is more than adequate for what Chrome OS needs), Bluetooth, Wi-Fi, a webcam, an HDMI port, two USB ports, an SD card slot, and two internal speakers.

Some things you won't find on the C720 that you might miss include a CD/DVD drive, multiple USB 2.0 ports, and some of the keys that you may have grown accustomed to on a Windows keyboard.  There is no Windows key (obviously) but there is also no Page Up, Page Down, Print Screen, Home, End, or Delete keys.  However, there are some new keys, including Refresh, two brightness keys, volume keys, a full-screen key, and more.  It takes some getting used to, but you can get by without Page Up and Page Down -- holding down the Alt key while using the up or down arrows will do the same thing.

The keys on the keyboard are flatter than on a traditional laptop keyboard.  The lack of texture makes typing by feel a little harder (until you get used to it) but it also means the keys don't pop off like they sometimes do on other laptops.

If you do a lot of printing, that may be one area of concern with upgrading to a Chromebook.  The Chromebook doesn't use print drivers like a Windows or Mac computer would use -- instead you have to use Google's Cloud Print capability (or another app) to manage printing.  For some older printers, you may only be able to print to them from the C720 "through" another computer.  Setting up Cloud Print can be interesting if you've never done it before, but it isn't bad once you get familiar with it.

The C720 uses USB devices just like a Windows PC does.  In fact, I've noticed that the C720 recognizes my USB mouse a lot quicker than my Windows laptop ever did.  With my Windows laptop, it used to take almost 10 seconds (sometimes more) before the computer recognized the mouse.  The C720 recognizes it within just a second or two.

If you're used to Microsoft Office programs, Google Docs is a little different.  It's a nice word processing program, but sometimes when you copy text from Google Docs to a web page in Chrome, some of the formatting is lost.  Bold text doesn't copy over in bold, for example, and sometimes text will copy as double-spaced, even if it wasn't double-spaced originally.  Also, Chrome OS doesn't come with a native text editor like Notepad.  (Google Docs can open and read .TXT files, but it can't edit them.)

All in all, I am very happy with the C720 and would absolutely recommend it.  For the money I spent, it is an amazing buy -- the battery life alone is worth it.  Check it out for yourself -- the C720 listing on Amazon gives a lot of description about what you get with this Chromebook.  Even against other Chromebooks the C720 compares favorably.  It is less expensive than almost all Chromebooks listed on Amazon -- even some of the used ones.