 In Windows, you can share folders to make them accessible to other users who don't have physical access to your computer. Folders can be shared across the network, which is also useful for sending documents or images from a scanner directly to your computer. Many scanners support SMB scanning (also called scan to folder) which generally requires the destination folder to be shared.
To create a shared folder, you first need to create the folder. (If you've already created the folder, skip this step and navigate to that folder instead). Click on the Windows icon in the lower left corner of the screen to bring up the Start menu, then select Computer. From here, select the C: drive. Right click in the white space of the C: drive and hover over New. A submenu will appear; select Folder. Type in a name for the folder, then press the <ENTER> key.
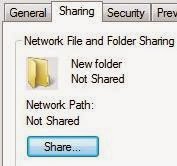
Now that you have your folder, you can share it. Right click on the folder and select Properties. Select the Sharing tab. Under where it says "Not Shared," click Share.
A list of users or groups will be displayed. Select the ones that you wish to share your folder with. If you don't see the user or users you're looking for, click on the drop-down arrow and select them. Or, to share the folder with everyone, click the drop-down arrow and select Everyone. Then click on Add.
By default, anyone you add will not have the ability to change or edit files in this folder. You can give them that permission by clicking on "Read" and selecting "Read/Write" instead. For setting up scan to folder, you will need to give either a specific user (that you will use as the authenticating user) or everyone the ability to write to that folder.
Once you have all the users you want added and they have the permissions that you want to assign them, click Share at the bottom of the window. Windows will begin the process of sharing the folder, which may take a little while. When it has completed, click Done.
No comments:
Post a Comment