Many computer users need to print labels, both for home and business use. If you have a printer that you can print to from your computer, you can use Microsoft Word 2003 to print labels.
Before printing, make sure the labels that you have are compatible with your printer; otherwise, the label might not be aligned correctly, or it might smear or jam. Most labels specify on their packaging what types of printers they are designed for, and you may be able to find a list of what types of labels are not meant for certain printers on the manufacturer's website. Running labels made for an inkjet printer through a laser printer, for example, can cause all sorts of problems to the printer.
To print a label in Word 2003, click on Letters and Mailings under the Tools menu, and in the submenu that appears, select Envelopes and Labels. Click on the Labels tab, and in the empty text box type the information you want to appear on your label. By highlighting the text, right-clicking on it, and choosing Font, you can adjust the text's font, size, and style.
In the lower right corner of the Envelopes and Labels window is a box marked Label, with a picture of a label. Click on the picture to bring up the Label Options windows, where you can tell Word what kind of labels you have. Select the type of label and the product number, and check the specifications to make sure you have the right one.
If you can't find your labels on the list, you can input the specifications for the labels manually by clicking on the New Label button. Using the guide at the top of the screen, enter the label's dimensions and choose the page size. Give the label a name and click OK to save it. (You may want to print a test label first to make sure the dimensions are right.)
If you only want to print one label and not a full page of the same labels, click the button next to "Single label" below the text box. As long as you are using a sheet with more than one label per page, you will be able to select which label you want to print, by choosing the row and/or column information.
Once you've got your label information entered and you're ready to print, put the sheet of labels in the printer, in the correct direction and orientation. Some printers require paper to be fed face-up, while others need it to be face-down. If you are not sure which way your printer prints, print a test page (using plain paper) to find out.
When the labels are in the paper tray and everything is set, the last thing to do is hit Print in the Envelopes and Labels window. You won't be given the option to choose a printer, so make sure your default printer is the one you want to use.
If the label didn't print right, go back into the Envelopes and Labels window and make sure you had all of the information entered correctly. If the labels jammed, they may not be compatible with your printer, and you may need to try a different kind of label. For some printers, you will also need to make sure the printer is set for label paper in the tray that you are using; it may alter the print settings to optimize printing on labels.
(Originally published on Helium.com, May 2010)
Tuesday, December 29, 2015
Thursday, December 24, 2015
How to add a web page shortcut to an iPad's home screen
 Bookmarks in your web browser are a good way to "save" web pages so you can go back to them again easily next time. However, for web pages that you visit often, you might prefer to put the bookmark directly on your iPad's home screen. By doing it that way, you can just tap the icon to open the web page, rather than having to open the browser first, then go to your bookmarks and find the one you want.
To add a shortcut to a web page to your iPad's home screen:
- Open Safari
- Navigate to the web page you want to create a shortcut for
- Tap the rectangle with the arrow coming out of it at the top of the screen
- Tap Add to Home Screen
- Change the name of the shortcut if you wish
- Tap Add
These steps were written for an iPad with iOS version 5.1.1. The steps may vary for other versions.
Friday, December 18, 2015
How to optimize the hard drive for a Sharp MX series copier
 Like computers, copiers and printers have internal hard drives to store data. Over time, these hard drives get cluttered and need to be cleaned up to perform at optimum levels. On a Sharp copier, you can defragment the hard drive by using the "optimization" feature.
Follow the steps below to optimize the hard drive for a Sharp MX series copier. You won't lose any stored data when you optimize the hard drive, but any current or pending jobs will be deleted.
- Press the System Settings button. (If admin controls are enabled, you may need an administrative password to get into the system settings.)
- Tap Device Control.
- Tap Other Settings.
- Scroll down and tap Execute next to "Optimization of a Hard Disk."
- Tap Yes.
The process will typically take just a couple of minutes, but may take longer if the hard drive is extremely fragmented. Upon completion, the copier will automatically reboot.
The steps above were written specifically for the MX-M283N / MX-M363N / MX-M453N / MX-M503N family. The wording will be similar, if not identical, for other copiers in the MX series. Some MX copiers won't have the Other Settings menu, for example; the hard drive optimization option will be directly under the Device Control menu.
Saturday, December 12, 2015
Android app review: Simple Notepad
Unlike BlackBerry devices, Android phones don't typically come pre-installed with a notepad app. If you need a notepad app, whether for business or personal use, there are several free apps you can download from the Google Play store. One of the better free notepad apps is Simple Notepad.
Simple Notepad comes with a lot of useful features. You can create folders, so that your notes can be organized into separate groups. The folders feature can be turned on or off, so that if you only use one folder, the folder structure won't get in your way. You can also use Simple Notepad to make checklists, and Simple Notepad notes can be sent to other people or shared through social networks. You can even set reminders for specific events or tasks, and Simple Notepad is able to be password protected to prevent anyone else from reading your notes or checklists.
 You can create notes with titles displayed in different colors, to highlight important notes or to organize your notes into colors based on their content. The app even includes its own search feature, to help you find specific notes quickly. You can search note titles as well as their content.
Simple Notepad is very easy to use, and it comes with a user-friendly menu system. You can make the app as simple or complex as you want. If you only need a plain, no-frills notepad app for your phone or tablet, Simple Notepad can be that app; all of the additional features and functions can be ignored, and they won't get in your way as you create and edit notes. You can even change how the app's home screen appears to make it more convenient for you so you don't have to switch to a certain screen every time you open the app.
One nice feature that Simple Notepad has is the ability to sort notes. You can choose the criteria used to sort notes (by title, by color, or by date created) and you can enable auto sort so that new notes are automatically sorted by the same criteria.
You can back up your notes from Simple Notepad into a text file, and while it works well, it's not seamless. When you restore any notes back into Simple Notepad, the notes lose all formatting (though the content will be there).
Simple Notepad was developed by Mightyfrog and it can be downloaded directly from the Google Play store. It has an average user rating of 4.5 out of 5, and it's compatible with Android version 2.2 or newer. The current version of the app, version 1.7.3b, only takes up 568 KB of space (plus additional space for your notes and checklists). For users worried about privacy, the only permission this app requires is the ability to edit or delete the contents of your phone's USB or SD storage.
(Originally published on Helium.com, January 2013 -- updated October 2015)
Simple Notepad comes with a lot of useful features. You can create folders, so that your notes can be organized into separate groups. The folders feature can be turned on or off, so that if you only use one folder, the folder structure won't get in your way. You can also use Simple Notepad to make checklists, and Simple Notepad notes can be sent to other people or shared through social networks. You can even set reminders for specific events or tasks, and Simple Notepad is able to be password protected to prevent anyone else from reading your notes or checklists.
You can create notes with titles displayed in different colors, to highlight important notes or to organize your notes into colors based on their content. The app even includes its own search feature, to help you find specific notes quickly. You can search note titles as well as their content.Simple Notepad is very easy to use, and it comes with a user-friendly menu system. You can make the app as simple or complex as you want. If you only need a plain, no-frills notepad app for your phone or tablet, Simple Notepad can be that app; all of the additional features and functions can be ignored, and they won't get in your way as you create and edit notes. You can even change how the app's home screen appears to make it more convenient for you so you don't have to switch to a certain screen every time you open the app.
One nice feature that Simple Notepad has is the ability to sort notes. You can choose the criteria used to sort notes (by title, by color, or by date created) and you can enable auto sort so that new notes are automatically sorted by the same criteria.
You can back up your notes from Simple Notepad into a text file, and while it works well, it's not seamless. When you restore any notes back into Simple Notepad, the notes lose all formatting (though the content will be there).
Simple Notepad was developed by Mightyfrog and it can be downloaded directly from the Google Play store. It has an average user rating of 4.5 out of 5, and it's compatible with Android version 2.2 or newer. The current version of the app, version 1.7.3b, only takes up 568 KB of space (plus additional space for your notes and checklists). For users worried about privacy, the only permission this app requires is the ability to edit or delete the contents of your phone's USB or SD storage.
(Originally published on Helium.com, January 2013 -- updated October 2015)
Wednesday, December 9, 2015
How to email documents from Google Drive
Google Drive is a great tool that allows you to store and work with documents and other files online. You can easily share documents with other people by email, or even print them by email using software like Ricoh's HotSpot Printing or Pharos' Mobile Printing. The steps below will walk you through how to email a document from your Google Drive account.
First, log in to your Google Drive account if you haven't already done so. On the login page, enter your username/email address and password, then click the blue Sign in button.
 Once you've successfully logged in, open the document you wish to email. It should open in Google Docs but if it only opens a preview of that document instead, click Open at the top of the screen.
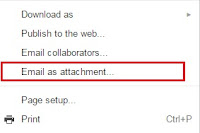
In Docs, select File. On the menu that appears, select Email as attachment and enter the email address you want to send the file to. Then click the blue Send button.
Note that certain mobile printing apps require you to register or confirm an account before printing. For these types of programs, they often email you instructions after you've sent the file to print, but with Google Drive, emails are sent with a generic reply-to address so the response email won't make it back to you. In these cases, you'll need to register your email address prior to emailing the document that you want to print. Some programs will hold your document and allow you to register after sending it, then print it once you've registered your email address. See that program's documentation for more details.
First, log in to your Google Drive account if you haven't already done so. On the login page, enter your username/email address and password, then click the blue Sign in button.
 Once you've successfully logged in, open the document you wish to email. It should open in Google Docs but if it only opens a preview of that document instead, click Open at the top of the screen.
In Docs, select File. On the menu that appears, select Email as attachment and enter the email address you want to send the file to. Then click the blue Send button.
Note that certain mobile printing apps require you to register or confirm an account before printing. For these types of programs, they often email you instructions after you've sent the file to print, but with Google Drive, emails are sent with a generic reply-to address so the response email won't make it back to you. In these cases, you'll need to register your email address prior to emailing the document that you want to print. Some programs will hold your document and allow you to register after sending it, then print it once you've registered your email address. See that program's documentation for more details.
Saturday, December 5, 2015
What is the MS-DOS Attrib command and what does it do?
Attrib is a DOS command that is used to change the attributes of a file or group of files. There are four basic attributes that you can modify with Attrib: read-only (R), system (S), hidden (H), and archive (A). Files either have each of these attributes or they don't, and you can turn the attributes on or off.
The read-only attribute means a file can not be modified (by most applications). If you try to edit a read-only file from the command prompt, a message will be displayed stating that the file can not be modified. If you try to edit the same file in Windows, you can make changes to it, but you won't be able to save the file.
Files with the system attribute are system files that should generally be left alone. If you try to change the other attributes of a system file from the command line, you'll see the "Not resetting system file" message. In order to change a system file's other attributes, you'd have to remove the system attribute, change what you wanted to change, and then put the system attribute back.
Files that are hidden can not be viewed by the dir command or seen in Windows Explorer (unless you have Windows set to show hidden files). Hiding a file can be helpful for privacy reasons, as well as to reduce apparent clutter.
The archive attribute is used for backup purposes. If a file has been changed since the last time it was backed up, it will generally have the archive attribute turned on.
To use Attrib, you must be at the command line. In Windows XP, type "cmd" in the Run bar, and in Windows Vista or 7, type it in the Search bar. (Then hit <ENTER>.) Attrib can be used several different ways.
Typing "attrib" by itself will display the files in the current directory along with their attributes. Each attribute will be represented by its first letter -- R, S, H, or A. If the letter is there, that file has that specific attribute turned on. If the letter is not there, that attribute is turned off.
To enable an attribute for one file, use the plus sign (+) and the attribute's letter. For example, to make the file "data.txt" hidden, you would type "attrib data.txt +h". You could also type "attrib +h data.txt" -- the filename can go before or after the attribute. To remove the H attribute, you would type "attrib data.txt -h".
If you wanted to make every file in the current directory read-only, you could do it by typing "attrib +r" without specifying a filename. Any file that's not marked as a system file would become read-only. If a file was already read-only, typing that command wouldn't change it at all. To remove the read-only attribute from those same files, you would type "attrib -r".
If you want to change the attributes of a file that uses spaces in its name, such as "johns data file.txt", you would need to put the filename in quotes; typing
attrib johns data file.txt +r
would result in an error message. You would need to type it as:
attrib "johns data file.txt" +r
You can alter attributes for a file anywhere on the computer, not just in the current directory, but in order to do so you would need to include the path as well as the filename (ie. "attrib c:\windows\temp\backup.dat +h").
Windows gives you some control over attributes as well, though not as much as you have from the command prompt. If you right click on a file in Windows and select Properties, you can turn on or off two of the file's attributes -- read-only and hidden. Changing either of these attributes in Windows will also affect the file's status at the command prompt.
(Originally published on Helium.com, May 2010)
Tuesday, December 1, 2015
How to find the IP address for a Lenovo IdeaTab A10-70 tablet
To see the IP address for a Lenovo IdeaTab A10-70 (A7600-F) tablet connected to a Wi-Fi network:
- Tap Settings on the home screen. (If you don't see it, drag down the notification bar at the top of the screen and select Settings there.)
- Tap WLAN.
- Select the current network. (It will probably be the first one, and it will say "Connected" underneath it.)
In the box that appears, the IP address will be displayed as either IPv4 Address or IPv6 Address, depending on which protocol your network is using.
Alternatively, you can view the IP address using this method:

- Tap Settings.
- Tap About tablet (at the bottom of the menu).
- Tap Status.
- Tap Settings on the home screen. (If you don't see it, drag down the notification bar at the top of the screen and select Settings there.)
- Tap WLAN.
- Select the current network. (It will probably be the first one, and it will say "Connected" underneath it.)
In the box that appears, the IP address will be displayed as either IPv4 Address or IPv6 Address, depending on which protocol your network is using.
Alternatively, you can view the IP address using this method:
- Tap Settings.
- Tap About tablet (at the bottom of the menu).
- Tap Status.
Subscribe to:
Posts (Atom)