Sunday, February 28, 2016

How to enable the bookmarks bar in Chrome

If your bookmarks bar isn't displaying in Chrome, there are two ways to quickly enable it:

With the mouse:
- Click the Menu button in the upper right corner (the icon with the three horizontal bars)
- Hover over Bookmarks
- Click Show bookmarks bar

With the keyboard:
- Press <CTRL> + <SHIFT> + <B>

The keyboard method won't work if focus is on a text field like a form; click somewhere outside the text box and try the keyboard shortcut again.

Thursday, February 25, 2016

Apple vs. the FBI: Did the FBI bite off more than they can chew?

By now, the Apple/FBI standoff over gaining access to an encrypted iPhone is no longer breaking news.  This debate will continue to rage for some time, as neither side seems willing to give in.

Both sides make compelling arguments.  The FBI is fighting for the cause of national security, and Apple is championing privacy and free speech rights.  But one side stands to lose considerably more than the other.

If Apple loses, and the courts (or lawmakers) force them to create code that will allow backdoor access into an encrypted iPhone, or allow infinite password attempts for brute force entry, then a blow will certainly have been struck against the rights of individuals (and corporations) vs. the demands of a government.  However, Apple itself won't suffer.

No one will fault Apple or stop buying iPhones if Apple loses its court battle.  The company will be seen as having fought the good fight and done what they could in the face of big government.  However, if the courts come down against the FBI and rule in favor of Apple's right to not be conscripted to create software, then the FBI (and the government by extension) will take a big public relations hit.

The FBI typically doesn't "lose."  It will not be a good look for them if that happens.  Perhaps when the attempt was first made to coerce Apple into helping the FBI beat the iPhone encryption, no one at the Federal Bureau of Investigation thought it would turn into such a big debate.  Maybe they didn't even realize what they were asking for.  There are probably still a lot of people not employed by Apple or the FBI who don't understand all that's involved in cracking the encryption.

But now that the battle lines have been drawn, if the FBI does not come out victorious, they will be seen as the losers -- government henchmen obstinately trying to shoulder their way past the Bill of Rights.  We'll have to wait and see what happens; both sides will meet in court on March 22nd.

(Image courtesy of Pixabay)

Tuesday, February 23, 2016

How to color calibrate a Sharp MX series MFP

On a color copier, making sure that the colors are calibrated correctly can go a long way toward maintaining or increasing print quality.  The process for calibrating color copiers varies greatly, but on many of the Sharp MX series color copiers, it is an easy task to complete, and it can mitigate or prevent poor color density.

There are two parts to color-calibrating a Sharp MX series copier or multifunction printer.  There is the color calibration process for the copier and the color calibration setting for the printer engine.  Both should be done to complete the calibration procedure.  (The exact steps may vary by model.)

Ledger-sized paper (11" x 17") will be required to run the calibration check, one sheet for each calibration.

Copier Color Calibration:
- Press the System Settings button
- Tap Copy Settings
- Tap Color Adjustments
- Tap Auto Color Calibration
- Tap Execute

The following message will be displayed: "Please Wait. Print quality is being automatically adjusted."

The calibration page will print out.  Place it on the scanner glass.  (If you orient it incorrectly, the machine will let you know.)  Tap Execute.  A message will be displayed to let you know whether the calibration process completed successfully.

Printer Color Calibration:
- Press the System Settings button
- Scroll down to Printer Settings and tap it
- Select Auto Color Calibration
- Tap Execute

The following message will be displayed: "Please Wait. Print quality is being automatically adjusted."

The calibration page will print out.  Place it on the scanner glass.  (If you orient it incorrectly, the machine will let you know.)  Tap Execute.  A message will be displayed to let you know whether the calibration process completed successfully.


If you are asked for an administrator password after pressing the System Settings button, contact your machine administrator.

The date of the last successful color calibration is stored in the machine, and can be checked by printing out a configuration page.

Saturday, February 20, 2016

How to restart a service in Windows Server 2008

Sometimes a Windows service freezes up, and it needs to be restarted.  You can restart all of the services by rebooting the computer, but many times this isn't a realistic solution, especially when you're dealing with a server.  This article shows you how to restart an individual Windows service in Windows Server 2008.

- Click the Start button
- Select Administrative Tools from the Start menu
- Select Services
- Scroll down the list to find the service you want to restart, and click on it once
- Click Restart (in blue)

If your Start menu doesn't have the Administrative Tools option, type "services" into the Search bar and then select Services from the list of results (or press <ENTER> if it's the highlighted result).

Thursday, February 18, 2016

How to incorporate CSS into your Wix.com website

There is a lot of built-in customization you can do with your Wix website.  If you want even more control over style, you can link to an external CSS file, include embedded CSS in the <head> of your web page, or use inline CSS with your HTML elements.

To use an external style sheet or embedded CSS:

- Log in to Wix
- Click the Edit Site link for the web site you want to modify
- Hover over Site at the top of the screen, and select Site Settings from the drop down menu
- Select SEO on the left side of the screen
- Scroll down to Header Code - Meta Tags

For an external style sheet, type or copy the following code:

<link type="text/css" rel="stylesheet" href="CSSfilename.css" />

Replace CSSfilename.css with the link to your stylesheet.  To use embedded CSS instead, include the CSS between <style></style> tags.

Once you've finished typing or pasting any style settings you want to include, click the X in the upper right corner of the Site Settings window.  Then click Publish in the upper right corner of the page to apply the changes you've made.

Instead of including CSS in the header portion of the page, you can incorporate it directly into the HTML elements themselves using the style attribute.  For example:

<p style="color: red; display: inline-block">

Note that Wix will not allow you to include <script> tags in your header.  Any JavaScript links or code must be placed in the body of your page.

Monday, February 15, 2016

How to enable the Favorites bar in Microsoft Edge

Even though it shares a lot of features with Internet Explorer, Microsoft's new Edge browser can seem alien to some users.  If you want to make the favorites bar appear in Edge, here's how.

With mouse/trackpad/touch screen:
- Click or tap on the icon in the upper right corner with the three dots next to each other
- Select Settings on the drop down menu
- Select View favorites settings
- Click or tap on the slider under "Show the favorites bar" (it will change from Off to On)

With keyboard:
- Press <CTRL>, <SHIFT>, and <B> together to toggle the favorites bar on or off.

Friday, February 12, 2016

How to remove the Archive button from Yahoo! Mail

Yahoo! Mail recently introduced its new "archive" feature, which is nothing more than another folder to store messages in.  But for some reason, Yahoo! decided to place the Archive button exactly where the Delete button used to be on the inbox toolbar -- so now when veteran Yahoo! Mail users try to delete an email, they often find themselves archiving it instead.

This adjustment is a minor inconvenience to some, and a major headache to others.  Fortunately, with a little JavaScript, you can remove the Archive button... as well as move the Delete button back to its rightful position.

Setup is just one step -- copy the JavaScript code below and paste it into a new bookmark on your browser's bookmarks bar.  Executing the function is similarly easy -- just log into Yahoo! Mail and click on the bookmark you made.  That's it.

This script runs best as a bookmark, because you can just click it once (after you log into Yahoo! Mail) and not have to execute anything else.  To remove the Archive button and restore the Delete button to its old position, save the following line of code as a bookmark in your web browser (details for how to do that can be found below):

javascript: (function deArchive(){setInterval(function(){document.getElementById('btn-archive').style.display="none";document.getElementById('btn-delete').style.left="-80px";document.getElementById('btn-move').style.left="80px";},400)})();

It's a lot of text, but it's a very small function that runs quickly and loops to keep that pesky Archive button away.  Once you've added it to your bookmarks bar, click on it once you've logged into Yahoo! Mail.  The archive button will disappear, and the Delete button will return to its previous position.  As long as you don't log out of Yahoo! Mail or refresh the page, the setup will remain that way.  (If you do either of those things, simply click the bookmark link to run the function again.)  You can call the bookmark anything you want that's descriptive for you.

This function was made with plenty of help.  Many thanks to AdBlock for helping to target the pesky Archive button, and to The X Trader for providing the idea to loop the function.

To create a new bookmark in Chrome:
- Right click on empty space in the bookmarks bar
- Click on Add Page...
- Next to Name: type the name you want to call your bookmark (ie. "deArchive")
- Next to URL: type (or copy and paste) the JavaScript code above
- Click Save

If you don't see your bookmarks bar in Chrome, press <CTRL> + <SHIFT> + <B> to make it appear.

To create a new bookmark in Firefox:
- Right click on empty space on the bookmarks bar
- Click on New Bookmark...
- Next to Name: type the name you want to call your bookmark
- Next to Location: type (or copy and paste) the JavaScript code above
- Click Add

To create a new bookmark in Safari:
Follow the steps in this article.  In Step #2, where they tell you to drag the website address you want to bookmark, copy and paste the JavaScript code above instead.

Once you've made the new bookmark, you can move it anywhere on the bookmarks bar by dragging and dropping it.

You will need JavaScript enabled in your web browser (which it probably already is) in order for this function to work.  This article will show you how to enable JavaScript in Chrome if you need to.  For other web browsers, see this Microsoft article.

If the Delete or Move buttons are not lined up well on your screen, you can adjust their position by changing the pixel count in the function (currently '-80px' and '80px', respectively).  The buttons as they are now appear reasonably centered on an 11" Chromebook and two 15.9" Windows PCs, but they may appear out of position on a screen with a different pixel count.

UPDATE: For Chrome users, this function is now available as a Chrome extension.  Just install it in your browser and it will automatically run on Yahoo! Mail pages, so you won't have to click anything or even think about it... the Archive button will automatically disappear when you use Yahoo! Mail and the Delete button will be where you're used to seeing it.

A version of this extension will be coming soon for Opera.

Thursday, February 11, 2016

How to prevent Kik from automatically playing videos

Kik is a good instant messaging app that allows you to send pictures and videos as messages.  However, Kik can default to automatically play any videos that someone sends you.  This setting can be problematic depending on where you are when someone sends you a video, such as at work or in the library.

You can disable this setting, and Kik will still download the video, but it won't begin playing it until you decide to start it.  To disable Kik's automatic video play:

- Open the app on your phone or tablet
- Tap the Settings icon in the upper right (the gear icon)
- Tap Chat Settings
- Tap Auto Play Videos
- Tap Never Play Videos Automatically

Tuesday, February 9, 2016

How to avoid the Load Extra Paper error on a Sharp MX series copier

If you're printing to a Sharp MX series copier and you're seeing the "Load Extra Paper" error (the exact wording varies on some models; it may say "Load A4 Paper") it's not because the copier is out of paper.  The document you are trying to print is either sized incorrectly, or its size does not match the size of any paper that's currently loaded in the copier.

To avoid this error, you can check document size before you print and make sure that you have the correct size paper loaded in the copier.  However, sometimes a document will be sized incorrectly, such as 8.5" x 11.35" instead of 8.5" x 11", so it won't match any standard paper sizes.  This often happens with documents emailed from other people or documents downloaded from the Internet.

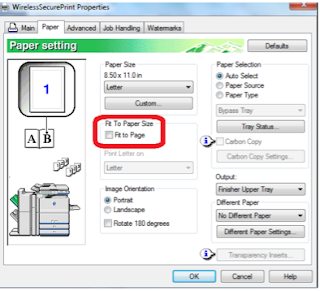
In these cases, you can "force" the copier to print your document on paper that's a similar size by using the "Fit to Page" option.  The "Fit to Page" option tells the copier to scale the document down (or up) so that it fits onto a paper size that is currently in use by the copier, so the document can print out without generating an error message.

To enable "Fit to Page" on a Windows computer using the Sharp PCL6 print driver:

- When you choose the option to print your document, select Printer Properties (or Preferences on some computers) in the print dialog box
- Click on the Paper tab
- Select Fit to Page
- Select OK
- Select Print

Before enabling "Fit to Page" if you get the "Load Extra Paper" error, you can either manually choose a paper size to print on, or you can delete the current print job, enable "Fit to Page", and print the document again.  To cancel the current print job:

- Select Job Status
- Select the print job to cancel, if there are multiple jobs listed
- Select Stop/Delete
- Select Yes

Saturday, February 6, 2016

How to add a web page shortcut to an Android device's home screen

On an Android phone or tablet, you can save web pages as shorcuts on your home screen.  Doing so makes it easier to access those web pages, because instead of opening a web browser and then selecting the bookmark, you can simply select the shortcut from your home screen to open that web page.

Below are instructions for saving a web page to your Android phone or tablet as a home screen shortcut.

- Open Chrome (either from your home screen or your list of apps)
- Navigate to the web page that you want to save
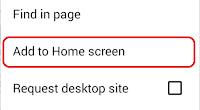
- Tap the Menu icon (with the three dots or three horizontal bars) in the upper right corner
- Tap Add to Home screen
- Change the shortcut name (optional)
- Tap Add

These instructions may not work on every mobile device, but they have been tested successfully on the following phones and tablets:
- Motorola Droid Maxx
- Samsung Galaxy Note 10.1
- Lenovo IdeaTab A10-70

Wednesday, February 3, 2016

How to incorporate CSS into your Weebly.com web site

CSS (Cascading Style Sheets) allows you greater control over how your web site appears and behaves.  Weebly.com gives you a lot of flexibility in creating a free web site, but if you want to add CSS to optimize your Weebly site for your visitors, follow the steps below.

- Login to your Weebly account (http://www.weebly.com/#login)
- Click the Edit Site button.  If you have multiple Weebly sites, click the Edit Site button next to the site for which you want to enable CSS.
- Click Settings at the top of the screen.
- Click SEO on the left side of the screen.
- In the Header Code section, type or copy this line:

    <style type="text/css">

    Add your CSS, then close it out with:

    </style>

- Click the green Save button at the bottom of the page.
- Click the orange Publish button in the upper right corner of the page.

If you want to link to an external CSS file instead, use this line rather than the HTML code above, replacing CSSfilename.css with the name of the CSS file to reference:

<link type="text/css" rel="stylesheet" href="CSSfilename.css" />

You could also add CSS directly into your HTML code on your page, if you are using HTML to design the page, by including it as an attribute, like this:

<tag style="CSSproperty:value">